[The first two parts of "Comet story" were backgrounds to why and how I came up to write a collaborative whiteboard. The application has now been taken off the web :-( This third and final part tells how I actually coded the app.]
Ever since I learnt computer programming with QBasic 12 years ago, only two languages have truely excited me - Prolog and Javascript. Like so many other things, I don't know the reason behind this. But being a PHP/Drupal developer, I get very little oppotunity to write Javascript code. When I do write Javascript, I enjoy every moment of it. So programming the collaborative whiteboard brought me tons of joy :-D
Now-a-days, we web developers like to think our systems separated into frontend and backend. I was showing the whiteboard to one of my fellow web developers and the first question thrown at me was - what is the backend written in? I did not know what to say as there is no backend. Like him, I was stunned too! I didn't realize until then that I am working on a Javascript only application. Javascript has really come a long way.
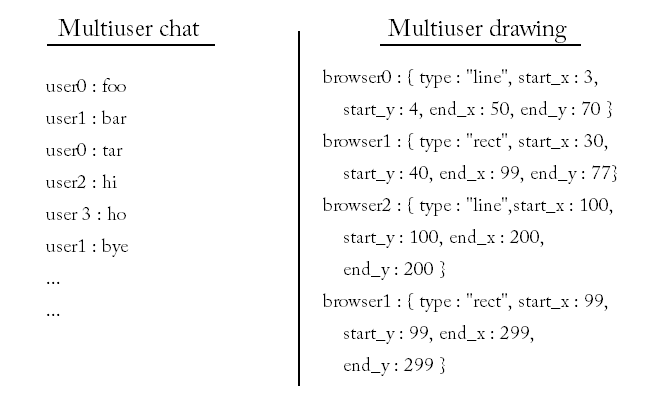
Before diving into the implementation details of the collaborative whiteboard, I will describe how it actually works. Let's first think about multiuser chat (MUC). In a MUC session, a group of people type whatever they want to type and their messages are passed to all the participating chat clients. A collaborative whiteboard is very similar where a group of people draw whatever they want to draw and their drawings are passed to all the participating browsers. In a MUC session, messages are carried as ASCII code, but we have no such code for representing drawings. But if we can think of drawing as a set of screen coordinates, then we can represent those coordinates as ASCII code and bingo! collaborative drawing becomes multiuser chat!
Once we can think of collaborative drawing as MUC, it becomes obvious that such drawing sessions can be hosted on a MUC server. As you can see, MUC has uses beyond chatting. In fact, I strongly believe that MUC has a very bright future.
As soon as we know that collaborative drawing is a kind of MUC, the implementation possibilities become very limited. This is good news for the implementor. Now try to follow the way all the implementation choices follow from the very first decision:
Decision 0: We need a MUC server. I choose ejabberd because it has strong support for BOSH which is a must for communicating with the web browser.
Decision 1: ejabberd is an XMPP server, so every whiteboard will need an XMPP client.
Decision 2: Our whiteboard is a web app, so it runs inside a web browser. The only way to run code in the web browser is Javascript. Which means the only XMPP client that can run inside the web browser has to be written in Javascript. And the only such available XMPP client library is Strophe.
Decision 3: Strophy makes Ajax calls to ejabberd. Ajax calls can be made only to the originating domain. So if Strophy wants to work with an ejabberd instance running at comet.example.net, Strophy must reside in an HTML page served from http://comet.example.net.
Decision 4: Our main HTML page comes from Apache at http://example.net. But Strophy can only work with http://comet.example.net. What do we do now? There is only one way - embed http://comet.example.net in a (i)frame inside http://example.net.
Decision 5: How do we create an HTML whiteboard in the shortest possible time? Use HTML canvas and some Javascript. Where do we get that Javascript code? Simple! Steal it from Mihai Sucan's tutorial at dev.opera.com :-)
Decision 6: We have our whiteboard and we have our XMPP client. How do we marry them up? err ... can't find any code to do that :-( There's only one solution left - let's write it!
Decision 7: We are being forced to write Javascript code. How can we improve our situation? There is only one way - bring in jQuery.
So here we have all our ingredients for creating a collaborative whiteboard -
- HTML Canvas
- ejabberd (version 2.0.4 or higher)
- Strophe
- Some code from Mihai's tutorial
ejabberd:
ejabberd is an XMPP server and not an HTTP server. But Strophe will want to communicate with it over HTTP. We make this possible by enabling the mod_http_bind module for ejabberd. Also, ejabberd has to serve an HTML page that gets embedded in http://example.net. This can happen when we enable the mod_http_fileserver module for ejabberd. I am providing my ejabberd configuration file which has all necessary directives to activate these modules.
Once ejabberd is setup, we need to create a MUC room in the server. First create two user account in the chat server and then login to one of those accounts using MirandaIM or Gajim. Next create a persistent MUC room. Pidgin currently cannot create persistent MUC rooms due to a bug.
More details on ejabberd setup follows.
Local drawing:
The whiteboard is based on Mihai's HTML5 canvas painting application tutorial. You can run the original application here. In this app, we can draw lines, rectangles and curves. I have added one more item - clear screen. Here is a very high level description of how Mihai's app works. The app has two canvas objects. One of the canvas is placed on the other.

The user only draws on canvas0. when he finishes drawing an object (e.g. a line), that object is copied to canvas1 which is at the bottom and then canvas0 is cleared. You can find the rationale behind this in the tutorial.
I took Mihai's approach a bit further and added a third canvas. This canvas is where all the remote drawings are dumped first and then copied to canvas1.
Remote drawing:
Remote drawing means drawing something on a local canvas which someone else has drawn in a different web browser. Remote drawing is triggered when any message of type "groupchat" arrives from the MUC room. This will trigger the onMessage() function (in bosh.js). onMessage reconstructs the coordinate data structure and passes the coordinates to img2_update() (defined in paint.js). img2_update() then calls img1_update() which draws the object (e.g. a line) on the third canvas using the appropriate drawing function (e.g. drawRect() ) and then copies everything to canvas0. At the end, it clears the third canvas.

Drawing propagation:
Propagating drawing to all the web browsers is a lot easier than it sounds. Drawings are propagated when the user has finished drawing an object (line/rectangle/curve) onto the board. The "mouseup" event signals that the user has finished drawing. The event handler for the mouseup event then passes the relevant coordinates to the MUC room. This happens with the help of the wireTransfer() function (in bosh.js). Now the question is, which coordinates do we send? For lines - we send two pairs -

These coordinates are put into an object and then that object is sent to the chatroom. The object for lines has the following format:
{
type : "line",
start_x : N,
start_y : N,
end_x : N,
end_y : N,
}
Same for rectangles -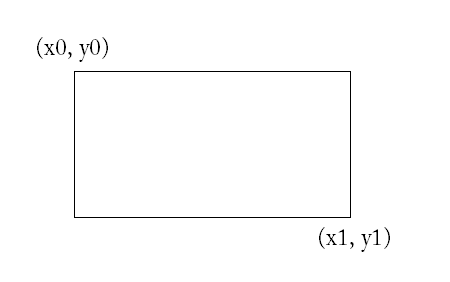
The object for rectangles has the following format:
{
type : "rect",
start_x : N,
start_y : N,
end_x : N,
end_y : N,
}
Curves drawn with the pencil are slightly complicated as they require a set of (X, Y) pairs to be redrawn -
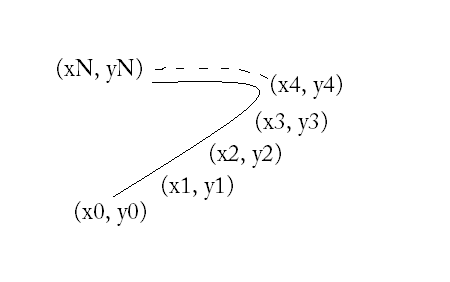
The object for pencil-drawn curves has the following format:
{
type : "pencil",
x_list : "x0, x1, x2, x3, ...., xN",
y_list : "y0, y1, y2, y3, ..., yN",
}
Before sending the object to the chatroom, it's actually translated into an XML element of name "draw". The object properties than become attributes of the "draw" object. So the above object from a pencil drawing will become:
<draw type="pencil" x_list="..." y_list="..." />
Factsheet:
| Chatroom | test-room@conference.remoteguru.info |
| Jabber ID | painter@remoteguru.info |
| Jabber passwd | secretPainter |
| XML snippet for sending msg | <message from="painter@remoteguru.info" type="groupchat"> <body> <draw type="rect" start_x="N" start_y="N" end_x="N" end_y="N" > </body> </message> |
| XML snippet for joining a chatroom | <presence to="test-room@conference.remoteguru.info/painter@remoteguru.info/N" /> |
Please note that there is no need to setup any DNS entry for conference.yoursite.net. Jabber clients will simply communicate with yoursite.net when the chatroom's domain is conference.yoursite.net. Also, because my demo is a public application, I am publishing the password here. But for any serious application, there will be no username/passwd embedded in the HTML page. Instead Jabber sessions are established at the server side (e.g. with PHP) and the session data is passed to the HTML page. A better explanation can be found here.
This is the end of the theory. What follows are explicit instructions to recreate the site in your own machine.
ejabberd setup
The most difficult part of setting up the whiteboard is to get ejabberd to play right. I will summarize the steps here. But the ultimate reference is the excellent ejabberd Installation and Operation guide.
- Install ejabberd. This can be through your operating system's package management system or from the source package.
- Download the ejabberd configuration file and copy it to the appropritate path (usually /usr/local/etc/ejabberd). Just don't forget to make a backup of the existing copy first.
- Open the configuration file and remove all references to "remoteguru.info" with your own hostname.
- In the configuration file, if you look at line # 431, you'll see this:
{mod_http_fileserver, [

                          {docroot, "/home/ju/ejabberd/www"},

                          {accesslog, "/home/ju/ejabberd/www/logs/www.log"}

                        ]}
Here "/home/ju/ejabberd/www" is the webserver root for ejabber's HTTP service. The Javascript application will be served from here. But the path can be different to your liking. - Create two ejabberd users; one for localhost and the other for your server's hostname:
$ ejabberdctl register root localhost PASSWD
$ ejabberdctl register painter YourHostnameHere secretPainter - Start ejabberd:
$ ejabberdctl startAlthough the shell prompt will return almost immediately, ejabberd can take a while to start up (up to a minute).
When I first tried to start ejabberd on my laptop, it would not budge. After lots of poking, it turned out that it didn't like the hostname of my machine. I only had "ju" as my hostname whereas it expected something like ju.SomeOtherThing. So I had to choose ju.localdomain (yes, this is a different machine from remoteguru.info). Be sure to avoid this pitfall. The log file was of particular help.
- Assuming ejabberd is behaving well, browse to http://YourHostName:5280/www. You should expect to see only one word - "eisdir". If it doesn't appear, then you have got problem :-(
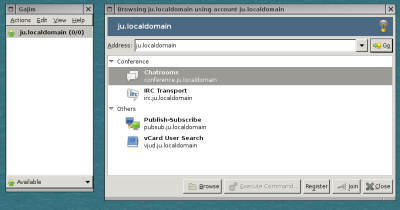
MUC room setup
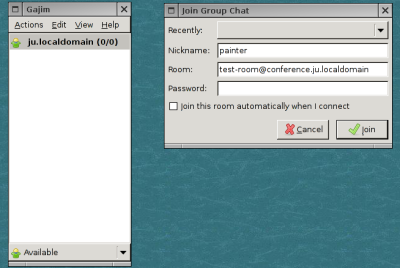
As already mentioned, this has to be done through a XMPP client. MirandaIM can do it in Windows and Gajim worked fine under Unix. Here are the steps along with some screenshots from Gajim:
- Login to the XMPP server with the id painter@YourHostName and password "secretPainter".
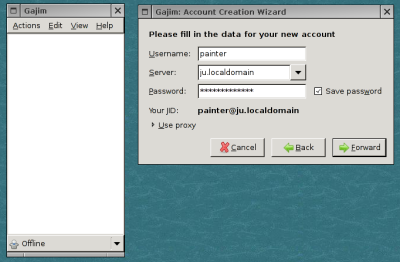
- Join the chatroom test-room@conference.YourHostName. This room does not exist yet, but will be created for you.
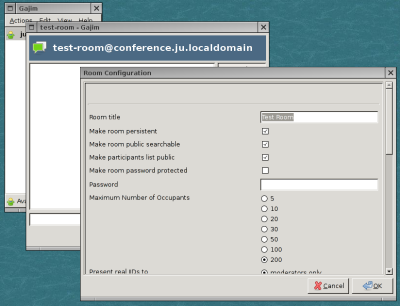
- Open the settings for the chatroom and make it a persistent chatroom.
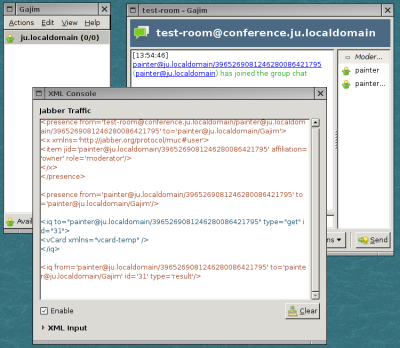
- Now you can stay on the room for debugging purposes or quit. Everytime somebody draws something, the XML console of your XMPP client will display the corresponding XML traffic. Of course you'll have to open the console first :-)
Application setup
This is the easiest part :-)
- Unpack paint.tar.gz inside ejabberd's webroot.
- Open bosh.js and replace all references to remoteguru.info with your hostname.
- In your browser, open http://YourHostName:5280/www/paint/paint.html
Once you are in the browser, you should see two messages under the drawing area - "Strophe is connecting" followed by "Strophe is connected". At this point you can open the page in other browsers and kick off a realtime collaborative drawing session. If, however, the second message indicates that Strophe has failed to connect, then it is time to worry about ejabberd's setup :-(
The End
I like the app, but there is one big disappointment in the whiteboard and that is lack of text support. This is because text support for the canvas element is only available in the ***very latest*** builds of Firefox/Opera/Safari. Fortunately, the StrokeText Javascript library can provide this functionality. But I only noticed this after finishing my app :-) Users of IE will be disapointed too. Although Google's excellent excanvas enables canvas support in IE, moulding Mihai's original app for IE turned out to be a bit more demanding and hence I decided to drop IE support. Apart from these facts, it's a good prototype. I hope you will enjoy playing with it :-)